The Nightmare of a Broken Website: Why Moving Your Domain Feels So Hard
I thought connecting a domain would take only five minutes. Instead, I spent half the evening staring at an error page and wondering what I had done wrong. I quickly found out that the two services do not connect automatically, and that small detail left my website offline for hours. After solving it myself, I realized that understanding a few basic DNS settings is often all it takes to get a website online.
You finally bought a beautiful domain name and a new hosting plan. You are excited to launch your new website.
But then, you hit a massive wall. Your browser screen shows a dark error page instead of your new site.
You feel confused, stressed, and completely lost. This simple task suddenly feels like a giant puzzle with missing pieces.
You spent hours choosing the perfect theme and writing your first posts. Now, everything is stuck in limbo because of a technical disconnect.
Many beginners face this exact fear. It makes you feel like giving up before you even start.
We often search online for help, but the search results make the situation worse. Here is why the search for a clean solution feels so hard:
- Outdated Tutorials: Most online guides use old screenshots that do not match the current screens of modern registrars.
- Technical Jargon: Tech blogs use heavy words like IP mapping, A records, and CNAMEs without explaining them simply.
- Wrong Information: Forums often give bad advice that can break your website or mess up your domain settings permanently.
- Lack of Step-by-Step Flow: Many videos skip the most basic steps, assuming you already know how servers work.
This technical confusion does not just stop your website. It deeply affects your state of mind in several ways:
- Loss of Motivation: You start doubting your ability to run a blog or a business online.
- Wasted Time: Instead of writing great content, you spend sleepless nights clicking random buttons.
- Fear of Losing Money: You worry that you wasted your hard-earned money on hosting that you cannot use.
- Imposter Syndrome: You feel like you need a high-priced developer just to point a simple domain.
Let us look at the reality of how domain names and hosting servers communicate with each other. It is helpful to imagine your domain name as a physical street address.
Your web hosting server is the physical house where all your website files, images, and posts live. Right now, your address is pointing to an empty lot.
We need to tell the global directory where your new house is built. This connection process is called pointing your domain.
When you buy a domain from one company and hosting from another, they do not talk to each other automatically. You must act as the bridge between them.
This gap is where most new bloggers lose their confidence. They assume that things should work right out of the box.
In reality, web services are built to be separate so you have the freedom to choose any host you want. Once you understand this basic concept, the fear goes away.
You do not need to be a coding genius to fix this issue. You just need a clear, friendly map to guide your steps.
Let us take a deep breath and look at how we can easily bridge this gap together. You are fully capable of doing this yourself.
The Simple Method to Connect Your Domain to Your New Web Host
Connecting your domain to a new server is much easier than it looks. We will break this process down into simple, manageable actions.
You do not need to touch any code or pay a specialist. Just follow these steps one by one, and your site will be live soon.
Step 1: Locate Your New Hosting Nameservers
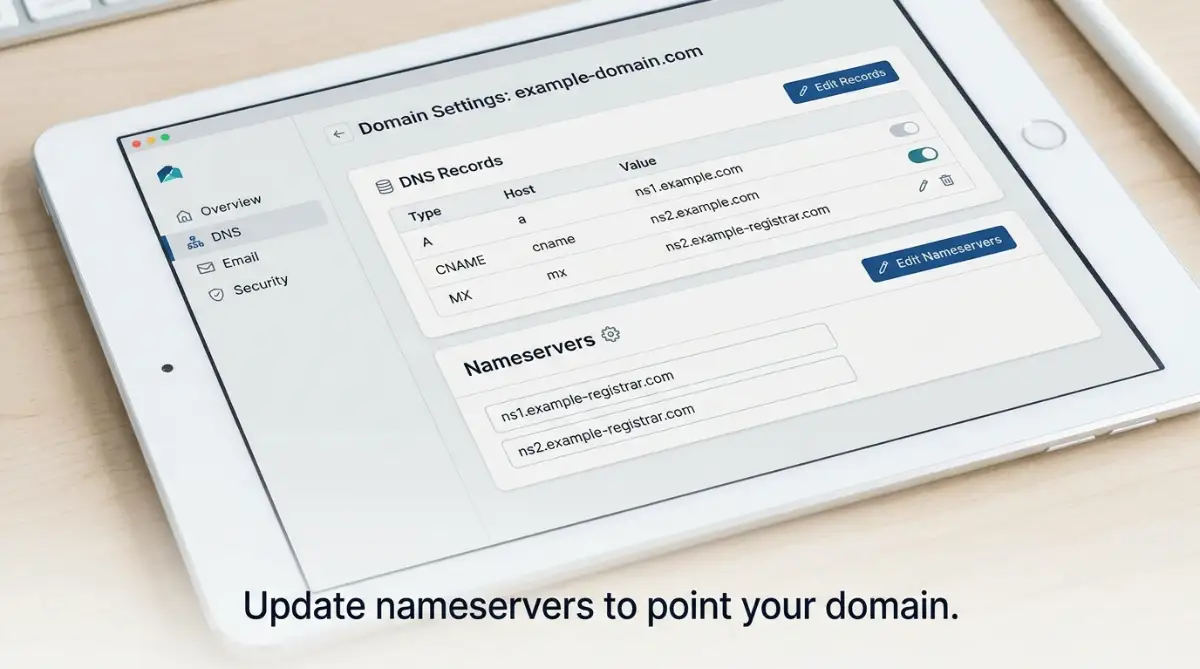
Before we change anything, we need to find the destination address. Your web host provides two unique addresses called nameservers.
Think of these nameservers as a digital signpost pointing directly to your host's server storage. They usually look like ns1.yourhostingcompany.com and ns2.yourhostingcompany.com.
There are three easy ways to find these nameserver records in just a few minutes.
Check Your Welcome Email
When you purchased your hosting plan, the company sent you an account setup email. This message is usually titled "New Account Information" or "Host Login Details".
Open this email and scroll down to the technical details section. You will almost always find your assigned nameservers listed right there.
Look Inside Your Hosting Dashboard
If you cannot find the email, log directly into your hosting client portal. Look for a section called "Server Details" or "cPanel".
On the main sidebar, there is usually a box showing your server status. Your nameservers are often displayed in that specific box.
Contact Customer Support
If you still cannot locate them, do not feel discouraged. Open a quick live chat with your hosting support team.
Simply ask them: "What are the nameservers for my account?" They will paste them for you immediately.
Write down these two nameserver addresses on a notepad or copy them to your clipboard. We will need them for the next step.
Step 2: Access Your Domain Registrar Panel
Now that we have the new nameservers, we must tell your domain seller to use them. Your domain seller is the company where you registered your domain name.
For example, you might have bought your domain name from a registrar like Namecheap or GoDaddy. Let us log into that account.
Go to Your Domain Management Page
Once you log into your registrar, find the dashboard or control panel. Look for a menu item labeled "Domain List", "My Domains", or "Domain Manager".
You will see a list of all the web addresses you own. Click on the specific domain name you want to point to your new host.
Find the Nameserver Configuration Section
Inside your domain settings, look for a tab or section called "DNS Settings", "Nameservers", or "Manage DNS".
By default, this section is usually set to "Default DNS" or "Registrar DNS". This means your domain is still pointing to the seller's parking page.
Prepare to Make Changes
Make sure you are in the correct area before editing anything. We want to find the option that allows us to add custom settings.
This is the bridge where your domain name will connect with your new server space. Let us move to the final step of pasting.
Step 3: Update and Save Your Custom Nameservers
This is the step where the real connection happens. We will swap the old addresses with the new ones we copied in Step 1.
Switch to Custom DNS Mode
In your registrar's nameserver settings, look for a dropdown menu. Change the setting from "Default DNS" to "Custom DNS" or "Custom Nameservers".
This action will open up empty blank boxes where you can type your new details. Usually, there are two boxes provided.
Paste Your Hosting Nameservers
Carefully copy your first nameserver from your notes and paste it into the first empty box. It should go into the field labeled "Nameserver 1".
Next, copy your second nameserver and paste it into the box labeled "Nameserver 2". Make sure there are no accidental spaces before or after the letters.
Save Your Settings
Do not forget to click the "Save", "Checkmark", or "Update" button to apply these changes. Registrars often have a green checkmark next to the boxes.
Once you click save, your domain registrar will start sending all traffic to your new hosting server. The actual configuration is now complete on your end.
Understanding the Waiting Period: DNS Propagation
After saving your changes, you might expect your website to load instantly. However, this is where many new website owners get confused.
When you type your domain into a browser, it might still show the old error page or a blank screen. Please do not panic when this happens.
Your domain changes need time to spread across the entire global internet. This waiting process is called DNS propagation.
How DNS Propagation Works
Think of the internet as a massive network of local directories. When you update your nameservers, your registrar notifies the main registry.
Then, local internet providers all over the world must update their own local copies of this directory. This update does not happen all at once.
It is like sending a letter to update your physical address. It takes time for every post office in the world to get the news.
How Long Do You Need to Wait?
Typically, the update process can take anywhere from a few hours to a full day. In some rare cases, it can take up to two days.
For most modern hosting providers, you will see your new site working within one to four hours. The exact time depends on your location and your internet provider.
How to Track the Propagation Status
You do not have to sit and refresh your browser page constantly. You can use free online lookup tools to check the progress.
Websites like whatsmydns.net let you type in your domain name. They show you a global map with green checkmarks indicating where your domain has updated.
If you see green checkmarks across most countries, your domain is pointing to the correct place. You can now start building your dream website.
The biggest mistake I made was changing my DNS settings over and over because I expected instant results. All I really did was create more confusion for myself. Once I updated the nameservers and gave the internet enough time to catch up, everything started working exactly as it should.
Still wondering why your website is not loading after changing your nameservers? Watch this short video first to see how DNS propagation works in real life. It will make the next steps much easier to understand and help you avoid common beginner mistakes.
A Quick Tech Laugh for the Waiting Period! ☕
Why did the domain name break up with its old web host?
Because it felt like they were no longer pointing in the same direction—and it desperately needed some server space!
Next-Level DNS Management: Going Beyond Basic Nameservers
Welcome back to the technical journey of setting up your online home. Managing your web domain properly is just as important as setting up your physical infrastructure. Learning about internet standards from ICANN helps us understand global naming systems.
Just like identifying major warning signs to spot in a home inspection before moving in, you need to verify your DNS settings before sending real users to your site. A small oversight now can lead to a broken experience for your visitors later.
If you are building an online business, maintaining a stable web connection is key to avoiding financial struggles. You can check out this guide on why bootstrapped startups collapse early to see how technical downtime affects early revenue and business growth.
To understand how these connections function globally, you can study the underlying system mechanics detailed by Cloudflare DNS Learning. This resource explains how domains translate simple text names into numerical machine addresses.
Step 4: Use a Cloud DNS Manager for Faster Performance
Instead of relying solely on your registrar's default platform, you can use a free cloud security provider to handle your DNS. This setup creates an extra shield between your website and potential online threats.
When you manage your records through a dedicated cloud platform, your propagation wait times often drop from hours to seconds. This means any future hosting changes you make will update almost instantly across the globe.
Securing this access point is incredibly important for your digital safety. It is very similar to following the easy security steps to secure your crypto wallet to keep your private assets away from malicious eyes.
Step 5: Modify Individual A Records and CNAME Records
Sometimes, you do not want to change your entire nameserver setup. For instance, you might want to host your website on a new server while keeping your business emails on your old provider.
In this specific scenario, you should edit individual A records instead of swapping nameservers. You do this by changing the IP address in your registrar’s DNS zone file to point to your new hosting server.
This advanced method ensures your professional email service never experiences a single second of downtime. It gives you complete control over where different parts of your domain are sent.
How to Keep Your Domain Safe and Stable in the Long Run
Once your domain is pointing to the right place, you must take active steps to protect this connection. Many website owners forget about their domain settings until something goes wrong.
First, always keep your domain lock status turned on inside your registrar dashboard. This simple safety switch prevents anyone from stealing or transferring your domain name without your direct permission.
Second, enable multi-factor authentication on both your domain registrar and hosting accounts. This prevents unauthorized users from logging in and altering your DNS records to redirect your traffic.
Finally, make a physical copy or snapshot of your DNS zone settings whenever you make major changes. Having these records saved on your computer can save you hours of rebuilding work if you ever need to restore your setup.
Consider the experience of a small business owner who noticed his website loaded very slowly in other countries. After switching to a cloud-based DNS management tool, his page speeds improved dramatically.
This improvement happened because the cloud service serves your domain settings from servers located closest to your visitor's physical position. It is a simple, free upgrade that can make a huge difference in user experience.

The Five Hidden Traps That Can Break Your Domain Connection
Pointing your domain seems simple once you know the steps, but a few small errors can easily break your website. Let us look at the most common mistakes beginners make so you can avoid them completely.
1. Forgetting to Clean Up Old DNS Records
When you update your nameservers, some old A records or text configurations might still remain active in your panel. These lingering instructions can confuse web browsers and cause your site to load randomly for different users.
Always double-check your zone file to ensure there are no conflicting points pointing to your old hosting IP address. A clean list is the best way to guarantee a reliable connection.
2. Neglecting Your Business Email Settings
Many website owners do not realize that changing nameservers will automatically wipe out their existing email connections. If you use custom email addresses, your inbox might suddenly stop receiving messages.
You must copy your old MX records and paste them into your new hosting DNS panel immediately. This quick action ensures your client communication remains active and uninterrupted during the transition.
3. Disabling Your Registrar Security Features
Some users temporarily turn off their domain privacy protection or security keys while trying to troubleshoot connection problems. This is a highly dangerous practice that opens your personal contact details to global web spammers.
Keep your privacy features active at all times, as they have absolutely no impact on your DNS propagation speeds. Your security should never be traded for a minor troubleshooting shortcut.
4. Failing to Set Up SSL Certificates First
If your new host does not have an active SSL certificate ready, pointing your domain will trigger a scary warning screen. Visitors will see a message telling them your connection is not secure.
To prevent this issue, set up a free SSL certificate inside your new hosting panel before you initiate the domain update. This ensures a seamless transition without setting off any security alarms.
5. Impatience and Making Continuous Changes
The absolute biggest mistake is not giving the internet enough time to update. If you keep changing your settings every thirty minutes, you constantly reset the update timer.
This impatient behavior can stretch a simple one-hour update into a confusing multi-day headache. Once you save your new nameservers, walk away from your computer and let the global servers do their work.
The Price You Pay for DNS Mistakes
Making these technical blunders can lead to severe issues for your online business. Your website might go offline for days, which can cause your search engine rankings to drop significantly.
Even worse, customers might think your business is closed or unsafe if they see broken screens or error messages. Taking a slow, careful approach is the best way to protect your brand and your peace of mind.
If you think you made a mistake, you can always use the command prompt on your computer to run a quick test. Typing a simple command like "ping" followed by your domain name will show you the exact IP address your computer is trying to reach.
If the IP matches your new host, then your local system has successfully updated. If it still shows the old IP, you simply need to clear your browser cache or wait a little longer.
Your Roadmap to a Secure and Smooth Online Journey
You now have the knowledge and tools to connect your domain name to any hosting provider with complete confidence. What once seemed like a terrifying technical barrier is now a simple checklist of basic tasks.
Remember that building a website is a step-by-step learning process. Every time you solve a technical issue like pointing your domain, you become a more capable website owner.
Take action today by logging into your account and verifying your settings using the simple guide we discussed. Your dream website is waiting to be shared with the rest of the world.
If you ever feel stuck, come back to this guide and double-check each step. You have the power to control your digital space, so take that first step forward now.
Think of your website as a physical business storefront that you are moving to a much better neighborhood. The moving process might require a little work, but the final outcome is always worth the effort.
By taking control of your own DNS records, you are laying down a solid foundation for your future web success. We are incredibly excited to see what amazing things you will build on your new platform. You can know more about Hosting & Domain search here.
Here is your quick checklist to keep in mind as you begin:
- Write down details: Keep a safe record of your old and new hosting credentials.
- Patience is key: Avoid refreshing your dashboard constantly and give the servers time to sync.
- Check SSL status: Always verify your security certificate is active right after pointing your domain.
- Monitor email delivery: Send a test email to your business address to ensure everything works.
After going through this process myself, I realized that moving a domain is much less intimidating than it first appears. A little patience, careful checking, and following each step in order saved me from unnecessary stress. If you are doing this for the first time, trust yourself and take it one step at a time because you are more capable than you think.
Still Have Questions About Pointing Your Domain?
If you're setting up a website for the first time, it's completely normal to have a few questions. Below are clear answers to the most common questions about domain pointing, nameservers, DNS propagation, and connecting your domain to a new hosting provider.
Frequently Asked Questions (FAQs)
1. How do I point my domain to a new hosting provider?
Log in to your domain registrar, replace the existing nameservers with the nameservers provided by your new hosting company, save the changes, and wait for DNS propagation to complete.
2. What are nameservers?
Nameservers are special DNS records that tell the internet where your website is hosted. They connect your domain name to the correct web hosting server.
3. How long does DNS propagation take?
DNS propagation usually takes between a few hours and 24 hours. In some cases, it can take up to 48 hours before the changes are visible everywhere.
4. Why is my website still not loading after changing nameservers?
Your DNS changes may still be propagating. If enough time has passed, double-check that the nameservers are correct and that your hosting account is properly configured.
5. Will changing nameservers affect my business email?
Yes, it can. If your email service uses custom MX records, make sure those records are recreated or preserved after updating your DNS settings.
6. Should I change nameservers or update A records?
If you want to move your entire website to a new hosting provider, changing nameservers is usually the easiest option. If you only want to point your website while keeping other services, such as email, on the current provider, updating A records may be the better choice.
7. How can I check whether my domain is pointing to the correct server?
You can use an online DNS checker or run a DNS lookup to confirm that your domain is resolving to the correct nameservers or IP address.
8. What should I do before changing my domain settings?
Back up your website and database, write down your current DNS records, verify your new hosting details, and make sure your SSL certificate is ready before making any changes.
Disclaimer:
The technical tutorials and guides provided on this website are for educational and informational purposes only. While we aim to provide accurate and up-to-date steps for managing hosting, domains, and servers, configurations can vary depending on your specific hosting provider. Always perform a complete backup of your website, database, and files before making any modifications to your DNS, server configuration, or domain settings. We are not responsible for any data loss, website downtime, or technical errors that may occur during your migration or setup process.